

You can learn a dozen chords and still get stuck the first time a blues in E shows up. The stumbling block is usually the same: a compact, slightly awkward grip that asks for fingertip precision and relaxed muting all at once. Today’s focus is B7 — the open dominant seventh that unlocks countless progressions — and how to play it cleanly, change to and from it fast, and use it musically right away.
Why this chord matters
In the key of E, the five-chord is built on B. Turning that five into a dominant seventh adds the tension that wants to resolve back to E — the engine of blues, rock, country, and folk. If you can voice it without buzz, switch to it on time, and control which strings ring, you’ll sound instantly more seasoned.
The exact fingering (open-position)
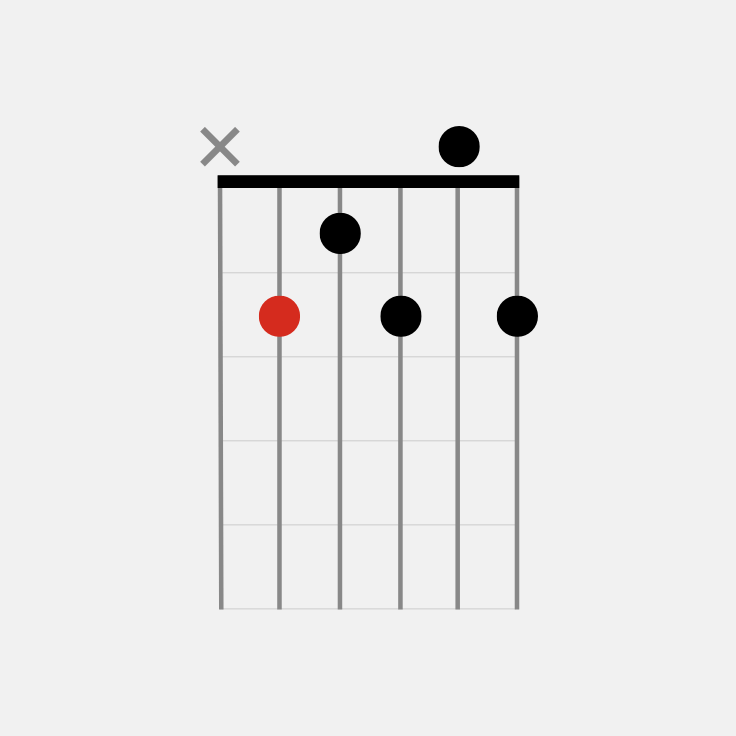
Set the shape like this, strumming from the fifth string down and muting the low sixth:
| String | Fret | Finger | Note | Tip |
|---|---|---|---|---|
| 5 (A) | 2 | Middle | B | Let this fingertip lightly touch the 6th string to mute it. |
| 4 (D) | 1 | Index | D# | Keep the knuckle high so the open 2nd string rings freely. |
| 3 (G) | 2 | Ring | A | Approach from a slight diagonal to avoid muting the 2nd string. |
| 2 (B) | 0 | Open | B | Test it alone; it’s the string most often choked by nearby fingers. |
| 1 (e) | 2 | Pinky | F# | Place right behind the fret; don’t over-squeeze. |
Fast fixes for the three most common problems
- Muted 2nd string: Rotate your fretting wrist slightly forward and raise your ring finger’s knuckle so its tip lands near-vertical. If that’s not enough, slide the hand a few millimeters toward the headstock to open space.
- Buzz on the 1st string: Move the pinky closer to the fret wire and reduce pressure by 10–20%. Paradoxically, less force often equals cleaner tone when your contact point is precise.
- Rogue 6th string: Use the pad of the middle finger on the 5th string to lightly touch the 6th. Strum from the 5th string to be safe during fast passages.
Make it musical on day one
Don’t wait to “perfect” the grip before using it. Put it into a tiny progression and let your right hand learn the feel of the shape while your left hand settles.
- Two-chord loop: E major for two bars, then the B-based dominant seventh for two bars. Keep the middle finger anchored at the 5th string, 2nd fret to speed up the switch.
- Classic turnaround: A dominant seventh (two beats) → E major (two beats) → B-based dominant seventh (one bar) → E major (one bar). Count out loud; land the shape exactly on beat 1.
Right-hand patterns that flatter the shape
Start with arpeggios, not full strums. Let the shape breathe.
- Simple pick pattern: 5–3–2–1–2–3 (repeat). Keep all notes even; aim for no string noise between plucks.
- Light swing strum: Down–down-up (rest) up–down-up, accenting beat 2. The open 2nd string becomes a sweet top note if your fretting hand is clean.
- Rake into the top: Very slow downstroke across 5–3–2, then let 1st string pop with a tiny upstroke.
Guided mini-exercises
- One-minute changes: Set a timer and switch between E major and the B-based dominant seventh as many clean repetitions as possible. Note your number. Aim to add 5–10 clean changes each day for a week.
- String check drill: Fret the shape and play each string slowly from 5 to 1. Any dud? Fix posture, then try again. Three perfect passes earns a metronome bump of +4 bpm on your practice groove.
- Open-string awareness: Mute all strings with the picking hand, then release only the 2nd string so it rings while holding the shape. Train your right hand to avoid accidental hits.
Voice-leading and smarter changes
The shortest-path mindset transforms your accuracy. Notice where fingers can stay put or travel the least.
- E major → B-based dominant seventh: Keep the middle finger on the 5th string, 2nd fret as an anchor. Slide the index from E major’s 1st fret on the 3rd string to the 1st fret on the 4th string; it’s a tiny move.
- A dominant seventh → B-based dominant seventh: Lift only what you must. The ring finger can hover close to the 3rd string 2nd fret in both shapes; build that hover habit.
- Back to E major: Release the pinky first so the top string stops ringing before the full change; this prevents smeared transitions.
Alternative voicing when the open shape feels cramped
Use an A7-style movable form at the 2nd fret for a tighter, slightly thicker sound:
Shape: x–2–4–2–4–2 (from 5th to 1st string). Barre lightly with the index at the 2nd fret on strings 4, 2, and 1. Add ring finger (4th fret, 4th string) and middle finger (4th fret, 2nd string). This grip removes the open strings, which some players find easier to control at tempo.
Rhythm first, then speed
Set a metronome to 60 bpm and play whole-note strums on the E–A–V7 progression (V7 meaning the B-root dominant seventh). If it’s clean, move to half notes, then quarter notes. Resist the urge to rush the change; anticipate it by lifting and traveling on the “&” of four. Your rhythm is the audience’s anchor — they forgive a tiny squeak, but not a late chord.
Where you’ll actually use it
Any 12-bar in E needs this sound. Country standards like Folsom-style progressions, early rock and roll, and a mountain of singer-songwriter tunes lean on the tension of the five-chord. The moment you can drop it in reliably, you can sit in on jams without fear.
A quick video refresher
Watch, then mirror slowly with your own guitar. Pause to check fingertip angles and muting as shown.
Ten-minute practice routine
- 30 seconds: Finger warm-up on strings 1–4, focusing on tip clarity.
- 2 minutes: Shape the chord, then run the string check drill until all notes ring.
- 2 minutes: E major ↔ the B-based dominant seventh, one-minute changes. Log your count.
- 3 minutes: Metronome at 70–80 bpm, eighth-note down-up strum on E → A7 → V7 (on B) → E. Keep strums light.
- 2 minutes: Arpeggio pattern 5–3–2–1–2–3 across the chord; aim for identical tone on each pluck.
Final cues that solve 80% of issues
- High knuckles, curled fingertips — especially the ring finger over the 3rd string.
- Touch-mute the 6th string with the middle finger; strum from the 5th.
- Anchor the middle finger during common changes to reduce travel time.
- Place pinky right behind the fret for the top-string note; don’t crush it.
- Breathe out on the downbeat of each change; relaxation improves clarity.
Master this one shape and a big chunk of real-world repertoire opens up. Give it a focused week and listen to your rhythm playing tighten, your transitions smooth out, and your blues in E finally snap into place.